Dithering is an important tool to consider when working with digital audio, especially when it comes to mastering. Dither can be a misunderstood term – and we would like to change that! Sure, it can be a pretty overwhelming subject, but this article will break everything down for you. We will cover all of the information you need to know about Dither. So you can make an informed decision about whether or not to use it.
What Does Dither Do?
Dither is a low level noise that is added to the audio you are producing. This noise helps to reduce any errors through changing the bit depth. Dithering isn’t exclusive to audio creation, and can be used in the prevention of unwanted patterns in images. For example, colour banding. It is all about the random vibration, as the word actually means ‘nervous vibration’.
History Behind Dither
The word actually comes from the Middle English verb ‘didderen,’ which means to tremble. This links to the discovery of Dither. One of its earliest uses can be traced back to World War II. When airplane bombers’ mechanical computers were able to perform navigation calculations far more accurately.
Engineers realised the aircraft vibration reduced the large majority of errors from sticky moving parts. This allowed for the aircraft to move in a continuous motion, as opposed to bumpy and short jerks of movement. Small vibrating motors were then swiftly built into computer monitors. This form of vibration was deemed to be a Dither.
It works the same way for your music, as Dither helps to increase the accuracy of your digital audio files.
Bit Depth And Sample Rate
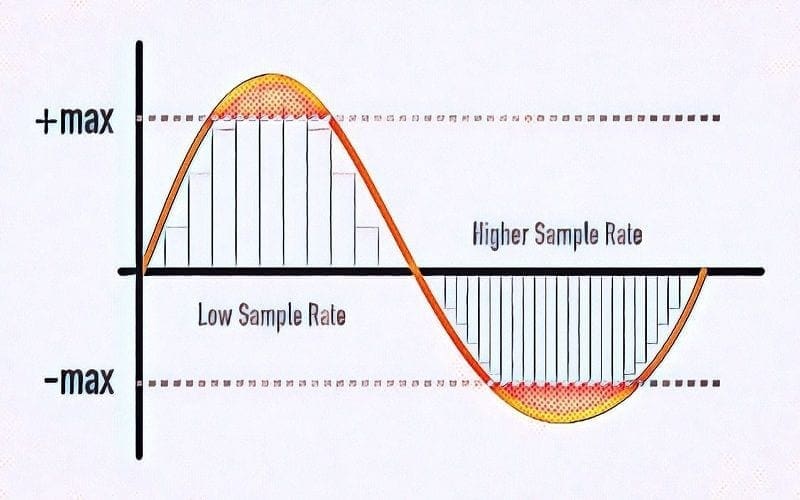
When it comes to digital audio, bit depth is really important. Before you even begin your recording, you will need to select the bit and a sample rate for the DAW session. The bit depth will determine the accuracy of your audio files. The analog digital converter (ADC) measures the level of the signal that is represented in a series of ones and zeros. The ADC then takes samples of the audio, which are then known as the sample rate of the bit depth.
A good tip is to have your sample rate as greater than or equal to twice the highest frequency of the audio. This way, it prevents something called ‘aliasing,’ otherwise known as distortion, from occurring. Having a higher bit depth will help to determine an exact description of the amplitude. Take 24-bit audio and 16-bit audio for example – the difference in their resolution is clear. 24-bit audio has a huge 16,777,216 levels of amplitude, while 16-bit audio has 65,536.
Quantization Distortion
However, there is a problem with the above. At some point, you will find yourself needing to lower the bit depth, which can in turn spark errors in the digital audio. Your DAW makes the calculations that power your equipment, such as plug-ins and faders, at a higher resolution than your audio files. This isn’t good, as it means that you will end up lowering the resolution of your music once it leaves your DAW, causing errors. This can create distortion and harsh noises on your digital audio files.
Example Of Quantization Error
Let’s break it down by thinking of an example, such as converting a file from a 24 to 16-bit resolution. Here, the digital audio software does something known as truncates (meaning it removes) the last 8 bits and has to sort out the data in order to fit the smaller number of digits available (known as ‘quantization’).
When your DAW quantizes the bits whilst converting the audio, there are fewer steps accessible to map out the amplitude levels to. This results in quantization distortion or quantization error taking place, which is something every music producer dreads! It will create distortion in your digital audio or unwanted low-level noise.
But won’t the music just cover it up, I hear you ask? Well, not all the time, and especially not with 16-bit audio, as it can be heard when the music is both fading in and out. Some music engineers believe that even if you don’t hear the quantization distortion (and some people claim you can’t hear it), it makes the music harsher to the human ear.
No matter what, you want your music to sound the best it possibly can. The good news is that proper Dithering can help to fix any quantization error or distortion, so read up on how it is done!
How Can Dither Help?
Dither can help fix your quantization distortion. All you need to do is to add Dither when you save a digital audio file to a lower sampling rate. This way, your file will undergo something called ‘decorrelation’, which is an important process. It makes the audio more random, and harder for people to notice any distortion taking place. By doing this, the quantization distortion is altered, and instead of an unpleasant hissing noise, is altered into a low-level analog hiss that is more pleasant on the ears.
Different Types Of Dithering
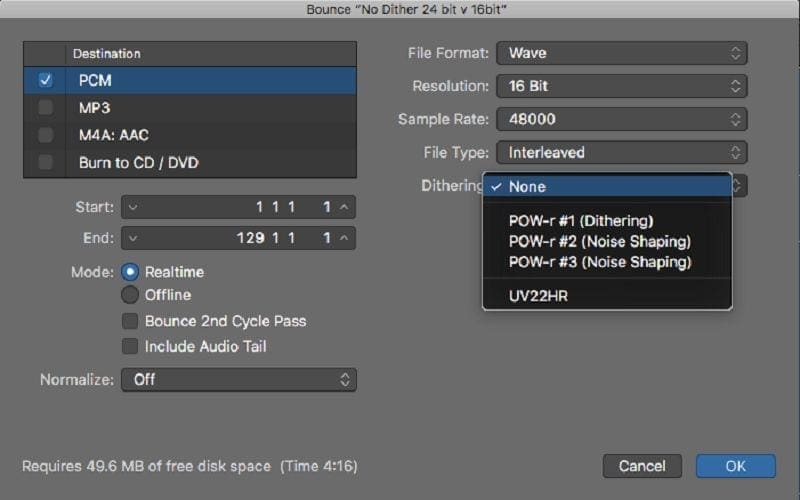
So, what Dithering options do you have? Let’s take a look into Logic Pro and what is on offer for your Dithering needs here. There are three different POW-r, otherwise known as ‘Psychoacoustically Optimized Wordlength Reduction’ options.
Type 1
The Type 1 POW-r Dithering option is primarily used for low-dynamic range mixes in highly compressed music genres, such as rock or pop. This option does not use any kind of noise shaping, because the noise that has been introduced has not been affected, meaning it has a flat frequency response.
Type 2
The Type 2 POW-r Dithering option is typically utilised for speech. It uses the process of equalization and noise shaping by weakening the noise in the 2kHz section, and amplifying it in the 14kHz section. Therefore, any quantization distortion gets removed, and any added noise will not negatively affect the sound.
Type 3
The Type 3 POW-r Dithering option is there for those recordings that are highly dynamic in nature, such as orchestral music. It utilises noise shaping as a technique but unlike the Type 2 POW-r Dithering option, the process is heightened. This essentially means that the EQ curve that’s in use is greater.
As we have discussed, the terms used for Logic Pro are Type 1, Type 2 and Type 3, but other terms that you will be likely to see for other plug-ins will be ‘Moderate,’ ‘Ultra’ and ‘None.’ They are self-explanatory, as None will do nothing, Moderate will moderately change the shape of the Dither, and Ultra will greatly change the signal.
They work in the same manner as the ones that we have discussed, by amplifying the higher levels of noise and weakening the noise in the 2kHz. This is just something to keep in mind when considering what plug-in to use, as you should always do some research into what the different terms mean before you begin to Dither.
Other Common Dithering Terms To Know
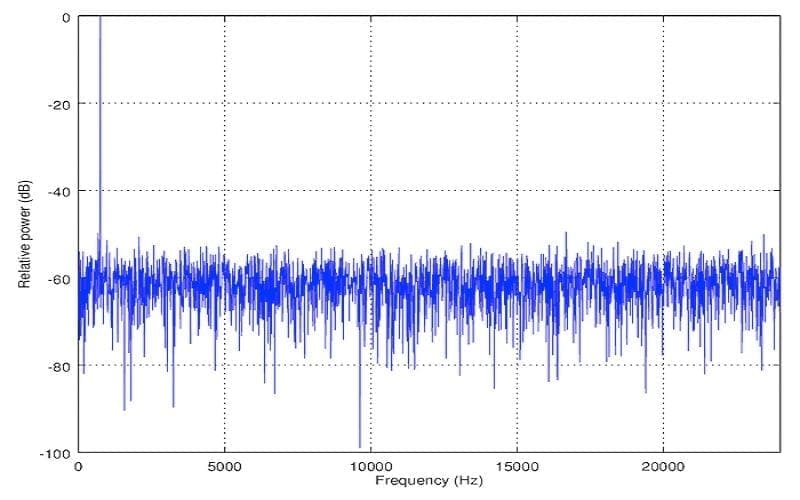
Rectangular Probability Density Function
Otherwise known as RPDF, this Dither noise means that any other value has the same probability of occurring. It also has an unchanging form of distribution.
Triangular Probability Density Function
Otherwise known as TPDF, this type of Dither noise has a triangular-shaped distribution, and a high probability of occurring. Achieved by adding two RPDFs.
Gaussian PDF
This has a normal distribution, and its probability is shaped like a bell, known as a Gaussian curve. This type of Dither is produced through analog sources (e.g pre-amps) and can Dither the audio if the bit depth is great enough.
Coloured Dither
This type of Dither relates to white noise, as it lowers the energy in the critical audio band through higher frequencies.
Noise Shaping
Noise shaping is a term that you may already have heard, and it combines the process of Dithering and equalization. This filtering process moves noise that has been created through Dithering into less noticeable parts of the frequency system. This means that it will be harder to hear, and this will help to reduce the noise floor, and can be achieved by adding Dither inside or outside the feedback loop. If added inside, Dither will shape alongside the quantization distortion. When added outside, the Dither will be part of the original signal and not be shaped. If this is not done, harmonic distortion will occur at the lower signal levels.
How Dither Can Help You

So, what are the key benefits of Dither when it comes to music production? Simple!
90% of any digital audio that you listen to, such as a CD, is made up of 16-bit resolution. Yes, the digital audio could have been tracked or mixed at 24 bits, but it is more than likely that the end product will be 16-bit resolution, as this is standard for a CD. This means that for music distribution purposes, your digital audio will need to be made up of 16 bits. And rather than hacking or chopping away at the excess bits, using Dither can fix the errors by rounding out the noise level.
Dither is easy to use once you get the hang of it, and can change your mastering process for the better. It smooths out any quantization distortion, helping to remove any grainy sound from your audio, and helps to produce professional-sounding audio! If you employ active listening, you may be able to notice differences in audio quality.
Some Key Dithering Tips To Take Away
Let’s break down some of the key Dither tips – including when not to Dither!
Don’t Dither:
- You should never Dither before converting to AAC or MP3.
- Don’t Dither if your audio is being prepared for an audio engineer (either 24/32 bit data). After all, they will know what they are doing.
- Once is enough – don’t Dither twice! It goes without saying – but this will add more unwanted sound to your digital audio.
- If your audio is going from a 32-bit floating point to 24-bit, then don’t Dither, as the depth cannot go any higher.
Do Dither:
- When you need to reduce your audio to a lower bit depth.
- If you are creating files of 16 bits for a CD format, or from a 24/32 bit mix.
- As your last step, you should never be using a processor or an audio editor. Always Dither last.
- Before you Dither, you should always check to see if any programmes you are using have Dither enabled by default. You should be the one in control of Dithering and only use it when it is needed.
- Be wary of interfering with the data compression process, and make use of the basic Dithering options such as rectangular or triangular to help with this.
Conclusion – How To Dither

So there you have it, your complete guide to the concept of Dithering!
Applying Dither can make a positive impact on your music, and once you have grasped the basics, it is easy to do. Plus, it is really simple to understand whether or not to Dither. If you forget, then you can always return to our helpful guide!
If you are still feeling overwhelmed about Dithering, we would recommend focusing on the basic Dither default mode. This way, you can ease yourself in, and make comparisons of the different noise-shaping options that are available. After all, practice makes perfect.
You work hard at your craft and you want your music to sound the best it possibly can. Dithering can greatly contribute to creating clear and crisp audio. We know that you will try out anything to better your audio quality, so it is worth a try. Ultimately, you don’t want distortion in your music, and Dithering can help fix this. Dithering can help to create your masterpiece, so why don’t you try it out today?


