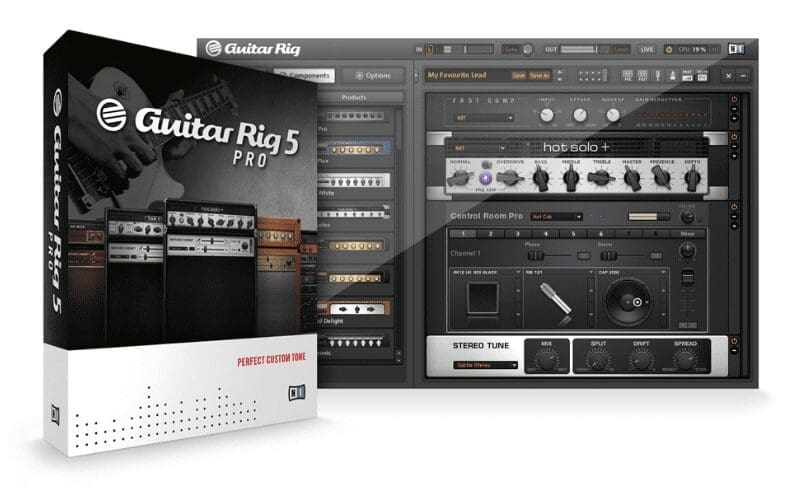
Guitar Rig Pro 5 is a powerful and intuitive piece of software, it is truly beneficial for all guitarists. Native Instruments Guitar Rig can become quite complex, so in this post, we are going to cover a general overview of Guitar Rig Pro 5 and what it is whilst highlighting some of the more important, popular, and advanced features. We’ll also talk about how to record in Guitar Rig 5.
What Is Guitar Rig 5?
Guitar Rig 5 is a flexible and powerful guitar amplifier (amp) and cabinet software modeled on real-world hardware. The amps and cabinets in Guitar Rig 5 are modeled with a technology Native Instruments calls “Dynamic Tube Response Technology.” This type of modeling technology gives the amps and cabinets the feel of the real original hardware they were modeled on. Guitar Rig 5 player allows us to use presets for fast inspiration, or create personal chains opening up an infinite range of creative possibilities.
Features of Guitar Rig
Guitar Rig 5 Pro comes with a variety of amps, cabinets, and effects. To be exact there are:
- 17 Amps
- 27 Cabinets
- 54 Effects
- A choice of mics and positioning
Note: If you don’t own Guitar Rig Pro, Native Instruments have a free Guitar Rig Player combined with Factory Selection. In it, you will get one Amp model with 17 cabinet emulations and 13 effects and modifiers.
Guitar Rig 5 Pro comes in both a plugin and a stand-alone application. While there are some differences (in the standalone software you have to configure your audio interface) between the standalone and plugin versions, the main functions of the software work the same way. In this post, we are going to use the Guitar Rig 5 plugin.
Presets: A Quick Overview
If you are new to Guitar Rig, a good place to start is the presets. There are hundreds of presets of all kinds to get you started. I often will load a preset to find the sound I am looking for, and then tweak or replace modules to dial in the sound or effect.
Usually, when I am working with a lead or bass guitar I will place Guitar Rig directly on the track. There are times though, especially when I am adding Guitar Rig to a synth (synthesizer) or vocal when I will send the original signal to another track with Guitar Rig on it (parallel processing). That way I can dial in the effect under the original track.
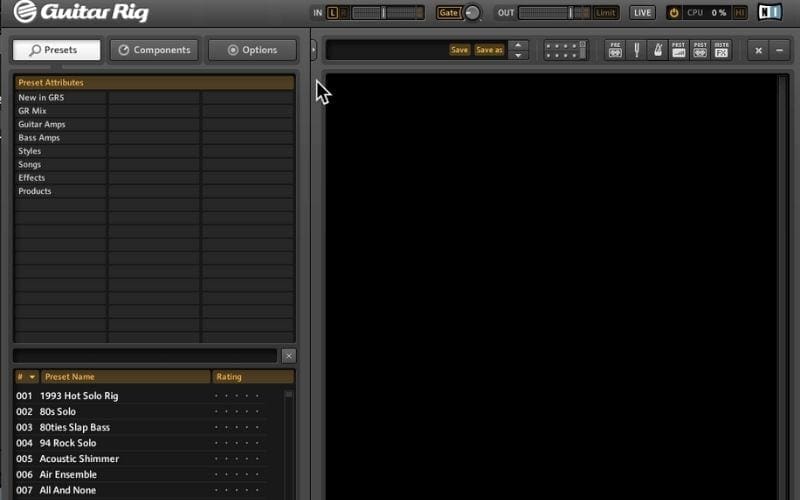
When you first open the plugin, you will see the interface shown below. The panes on the left are called the SideKick. This is where we find the individual Presets and Components.
Presets Section
Guitar Rigs typically launch with the Presets tab selected. Below that in the Preset Attributes, there are several items to click:
- New in GR 5. This lists in the box below the Presets Attributes box new presets that were added in Guitar Rig 5. Double-clicking on a preset name loads the preset in the panel on the left side.
- GR Mix. Here we will find a mix of presets from Guitar Rig 4 and 5
- Guitar Amps. These are the various amps that are available in Guitar Rig. When we select an amp the group of presets incorporating that amp and other components will appear in the Presets window.
- Bass Amps. This displays the Bass Pro Group. Selecting Bass Pro will display the Presets associated with this amp.
- Styles. The Styles Presets group displays a variety of presets designed around a style or genre. When we select one of these, we see a group of Presets in the window below inspired by that style or genre.
- Songs. These are presets that are inspired by certain iconic songs within a few genres.
- Effects. This is where we start to see the creative power of Guitar Rig 5. This is the area that I draw from most often, the various powerful effects available.
- Products. This area is where other Native Instruments products will appear if they have Guitar Rig presets.
Tip
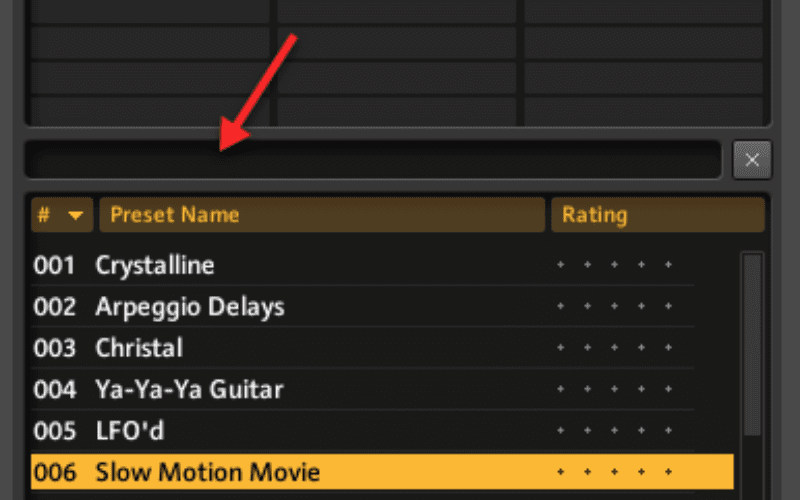
If you know the name of the preset you are looking for, then type that in the search/filter bar just above the Preset Attribute box:
Components Section
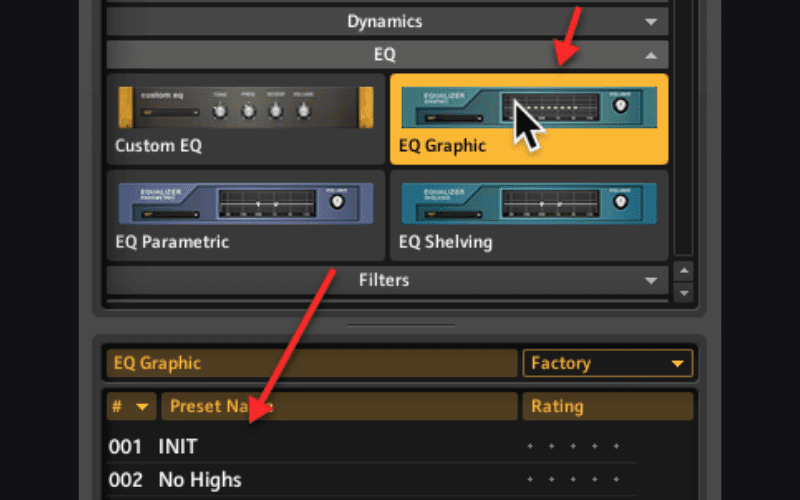
The components button lists all of the “gear” available to use. We can use just a single cabinet or multiple pieces of gear to build our very own custom rack. The first selection “Categories” divides the components into various categories. Included are:
1. Amplifiers
2. Cabinets
3. Delay & Echo
4. Distortion
5. Dynamics
6. EQ
7. Filters
8. Modifiers
9. Modulation
10. Pitch
11. Reverb
12. Special FX
13. Tools
14. Guitar tuner
Tip
After selecting a Component, clicking on the Presets button at the bottom of the Components Window will display the presets available for the selected component.
The Products Button lists the Native Instruments Products that are installed and that relate to Guitar Rig 5. Clicking the disclosure triangle to the right of the product displays the available components.
Options Section
This tab contains settings and configuration parameters. The Controller button is where we can add MIDI controllers. The Preferences tab is where we will find various program configurations and control settings.
Tip: It is a good idea to check the “Show Legacy Components” as this will unhide the cabinet and controls that were available in previous versions of the Guitar Rig plugin that are not available in the current version. Some of them are quite useful!
Global Header Bar
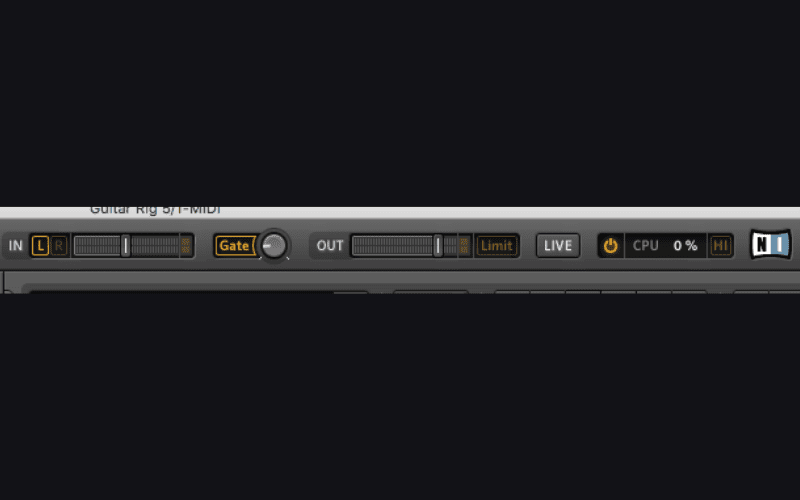
At the top of the Rack View panel is the Global Header Bar. This is where we set Stereo, Input/Output Volume, Enable/ Disable the Noise Gate, View the CPU usage, and Enable / Disable High-Quality Mode.
Other settings include:
- The LIVE button toggles to a more specific, yet simplified view that is great for live performance.
- The GATE knob will remove some of the noise associated with live instruments like guitars. Dial it in until the noise floor is diminished.
- The LIMIT button toggles the limiter on and off. This is good for live instruments to ensure that we are not overloading the incoming signal or that peaks to the signal do not distort.
- The HI button toggles a High-Quality Sound mode. This doubles the quality of the signal. It also significantly increases the CPU load.
Tip
As with many CPU-intensive plugins, I usually dial in my sound with the lower quality enabled, then switch to Hi-Quality when I am ready to bounce or freeze the track.
Important
To Process, a stereo signal makes sure that both the L and R buttons are turned on. By default, Guitar Rig 5 download assumes you are connecting a guitar and only has a single input activated.
Rack Tool Bar
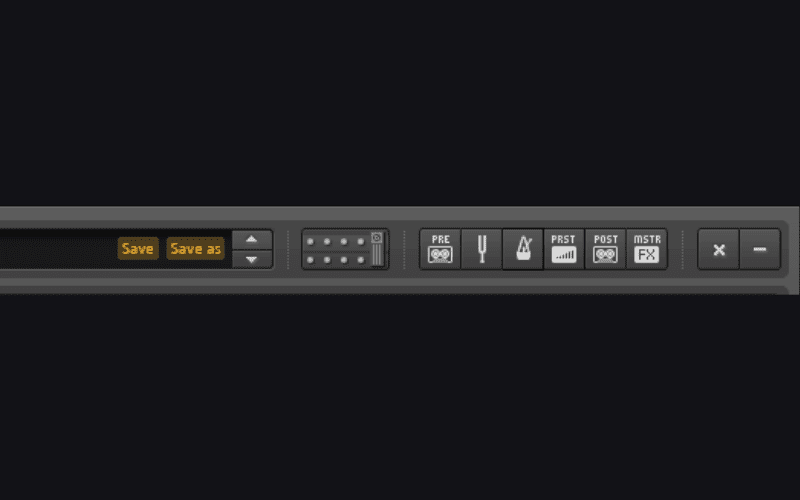
Next is the Rack Tool Bar. Inside the Rack Tools Menu, we can change presets, enable and disable components that come with the rack view, as well as minimizing and clear the components in the rack.
The items listed in the Rack Tool Bar are always available. They are not component or preset preset-dependent. Included are Tape Decks.
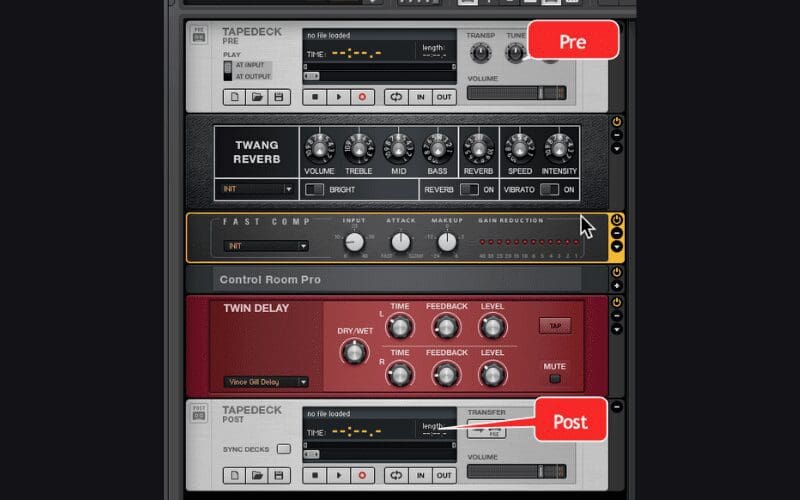
There are two Tape Decks available indicated by the cassette tape with the words PRE and POST on them. When we load a tape deck in a rack, the Pre will always come before the components in a rack, and the Post will always come at the end of the components in the rack. Placing the PRE Tape deck will allow us to record our guitar part, then create a rack of effects and play with different components to find what we like. This is preferable to continuously changing settings and having to play the same part over and over again. This is a great time saver!
Tip
To save the recording to a hard drive, click on the Disk button.
Tape Decks
There is another useful feature on the Tape Deck. Set the Input /Output setting on the Tape Deck to Output and load a pre-recorded track (drums for example) into the tape deck. We can play our guitar, synth, etc. live against the pre-recorded track. The pre-recorded track plays AFTER the effects rack while our live playing is processed by the effect rack!
We can also change the tempo of the pre-recorded track making it faster or slower. We can also “tune” the pre-recorded track to match the key we are playing in.
- The Tape Deck POST functions similarly. We can use it to:
- Record the pre-recorded audio track WITH our live playing processed through the rack
- Record just our live playing being sent through the rack
- Using the “Transfer to Pre” function on the POST Tape Deck transfers the recording processed through the rack back up to the PRE Tape Deck!
Tip
Use the Sync Decks button on the POST Tape Deck to ensure that the Pre and Post Tape Desk are in sync with each other.
Note
If you are using Guitar Rig to process audio already recorded on a track you do not need to use the PRE Tape component.
The Tape Deck component can be quite useful in live performance due to:
- A Tuner is indicated by the tuning fork. This allows us to tune a guitar to a variety of tuning scales.
- A Metronome is indicated by the metronome icon.
- The Preset Volume Component, allows us to adjust the relative volumes of the different racks that we create and store those with the presets. This creates a closer average volume between presets.
- Master Effects Module. This is a global module and applies to all presets loaded. This is especially useful when playing live. But we can also apply effects like a delay that will apply to the entire preset or any preset loaded.
To store a relative volume with a preset:
1. Load the Preset Component by clicking on it in the Rack Tool Bar (see below)
2. Start playing or start track playback
3. Press the “Learn” Button and keep playing until the Learn button turns off.
4. Go to the Preset window to the left and press the “Save” button.
Guitar Rig: Rack View
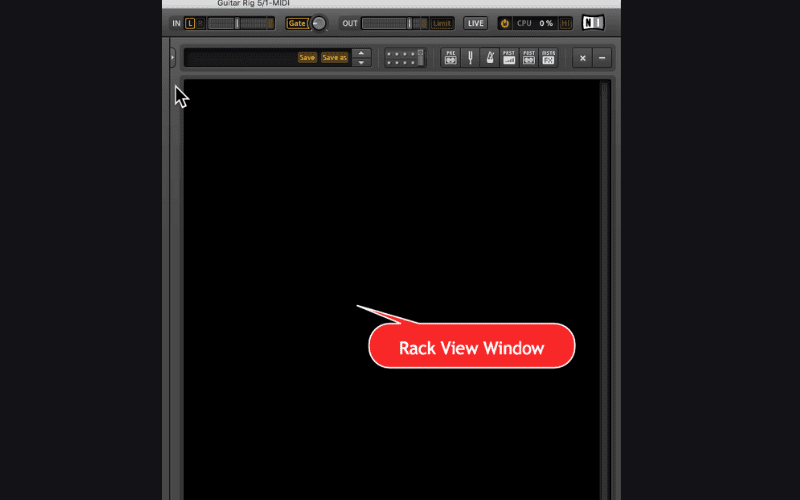
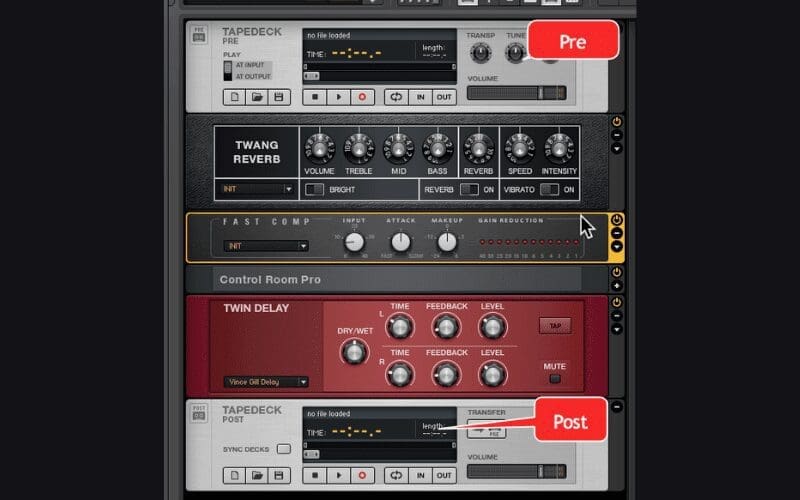
The large window on the right is called the Rack View. This is the main window we will work in.
When we load a preset we can see the individual components used in the preset in the Rack View window:
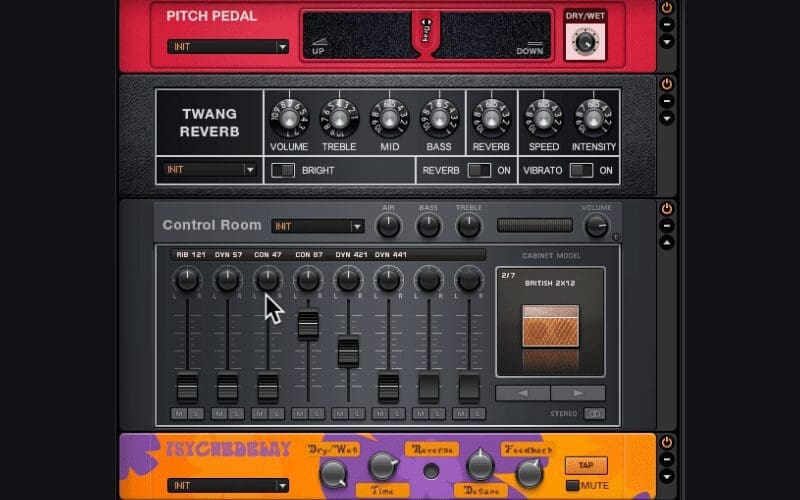
The signal flow is from the top of the rack to the bottom of the rack. So component 1 processes the signal, then passes it to component 2, and so on. We can change the position of a component by dragging it up or down, or remove a component by selecting it and pressing “Delete.” The power button will turn the component on or off. If we want to add a component, select the Component button and either double-click or drag the component from the component view to the rack view.
The order of effects is important. Typically, we will get a less harsh sound if we insert distortion and some other types of effects before the amplifier. Effects like Delay and Reverb are typically added after the amplifier. But it never hurts to switch things around to see which sounds best!
One of the great features of Guitar Rig is combining one group of components with a preset. For example, we can take an existing rack we created with a distortion component and amplifier and combine it with a preset:
First, go to the Components Window, select Products, and find the component. Next, select the Component and then click the Presets button. Then drag the preset into place on the rack which will ADD it to the track.
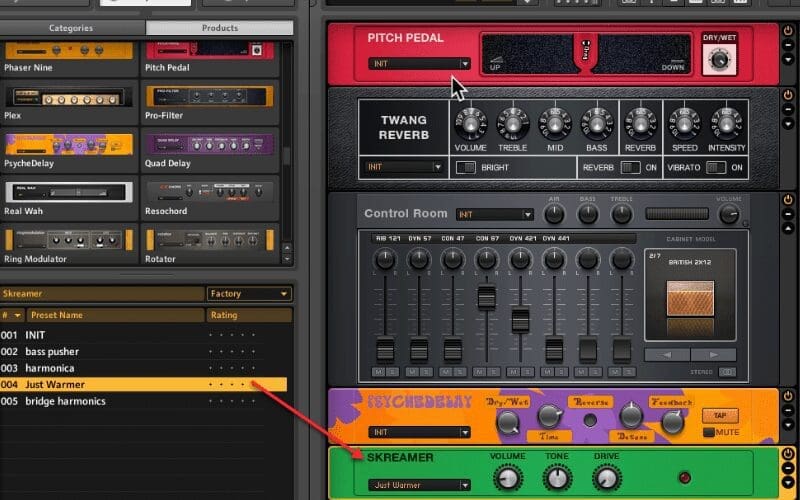
Tip
When you have modified or designed a new collection of components, save your preset before loading another preset as all preview components will be removed from the rack.
The Rig Control Button (see image below) allows us to show and hide a virtual rig control. This is similar to a foot controller. We can assign these controls to component controls in the rig above making for easy, knob, control changes to multiple components.
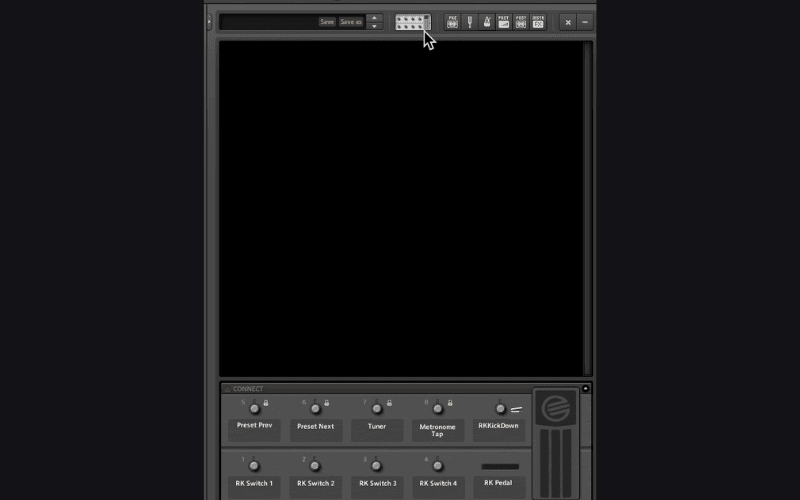
The most common use of Guitar Rig 5 Pro is amping a guitar or bass. This can be a real guitar or bass that is run through Guitar Rig or a virtual bass or guitar instrument.
Amps & Cabinets
In this section, we will take a brief look at the various Amps and Cabinets. In the Standalone versions if you go to Help, Then Open Manual then Components you will see a very detailed description of each Amp and Cabinet along with an explanation of what each control does
Amps
The Amps included in the package are:
1. Van 51 – used for hard rock
2. Hot Solo + – modeled after a hard-wired tube amp, great for solos
3. Plex – A classic Amp for Rock and Blues
4. Hot Plex – The Plex sound with added distortion
5. Cool Plex – Warm vintage sound with saturation
6. Lead 808 – Bright edgy lead sound
7. Jump – Smooth lead sound
8. AC Box – Used on lots of the British pop music
9. Citrus – 70s British sound
10. High White – The British sound of the Pete Townsend era
11. Jazz Amp – warm and clean for Jazz
12. Gratifier – emulation of a famous solo head with a tube power amp.
13. Ultrasonic – A modern amp with high gain
14. Twang Reverb – Rich tube amp sound with personality
15. Tweed Delight – American sampled amp with clean to dirty
16. Tweedman – A classic for bass or guitar
17. Bass Pro – Gritty and growling to make the bass stand out
When you load an Amp it will load its matched Cabinet as well
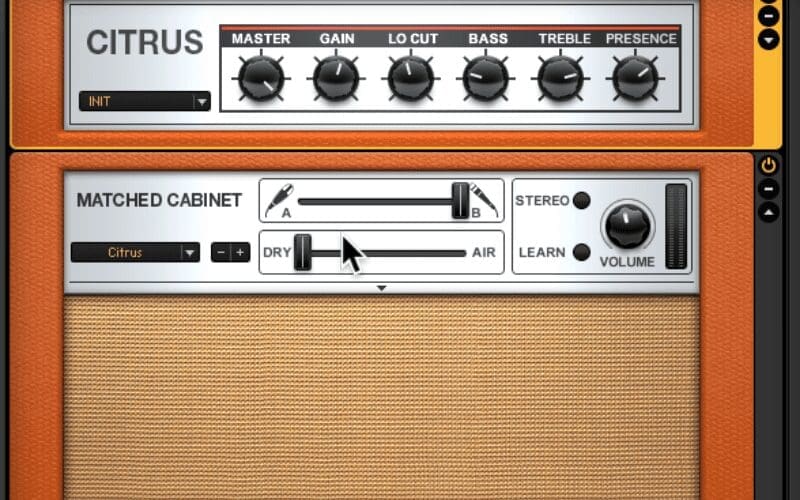
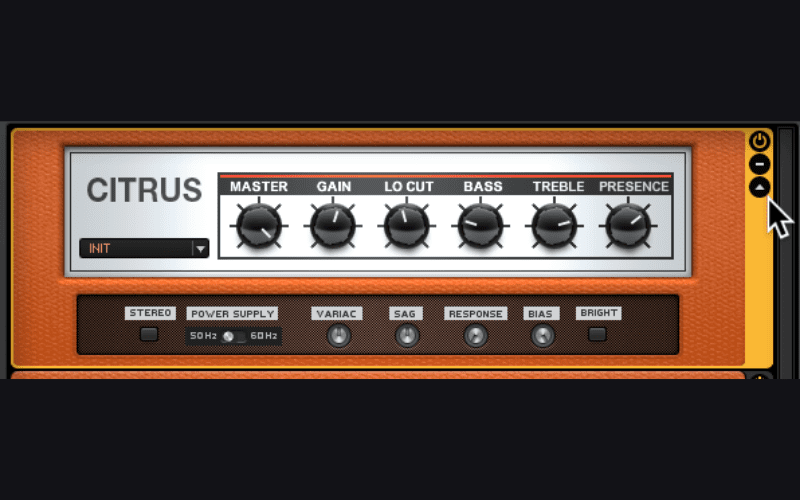
The controls found here are those we would typically find on an Amp: Gain, Lo-Cut, Bass, Treble, and Presence. Clicking on the disclosure triangle (in the above image where you see the word “Init” will allow us to load a factory or user preset or save a new or modified preset. Each Amp has an Expert Settings menu accessed by clicking on the disclosure triangle next to the close button (indicated by the arrow in the image below):
Guitar Rig
The Expert Settings control the behavior of the power amp section:
1. Power Supply – Changing this between 50Hz and 60Hz can change the tone of the Amp
2. Variac – Emulates changing the voltage at the transformer. Decreasing the Variac starves the transformer of electricity, creating a dirtier sound. Increasing the Variac pushes more power into the transformer making a smoother sound.
3. SAG – this emulates what happens when the Amp is turned up loud. Increasing the SAG creates a compressed effect making it sound larger and resemble tube amps. Decreasing the SAG resembles the sound coming from a solid-state amplifier.
4. Response – emulates the storage capacity of the power supply capacitors. Turning down the response increases the capacity making a stiffer sound. Turning up makes a less responsive sound that is more rubbery and soft.
5. Bias – this changes the grid bias of the power tubes. Increasing provides a more saturated sound at the expense of sound. Decreasing Bias provides a more open and reliable sound. Bringing the Bias down can also clean up some of the muddiness of distortion.
6. Bright – found on some Amps. This makes the sound bright and thin.
TIP
Check the Expert Settings on each Amp as the features vary from each.
Guitar Rig: Cabinets
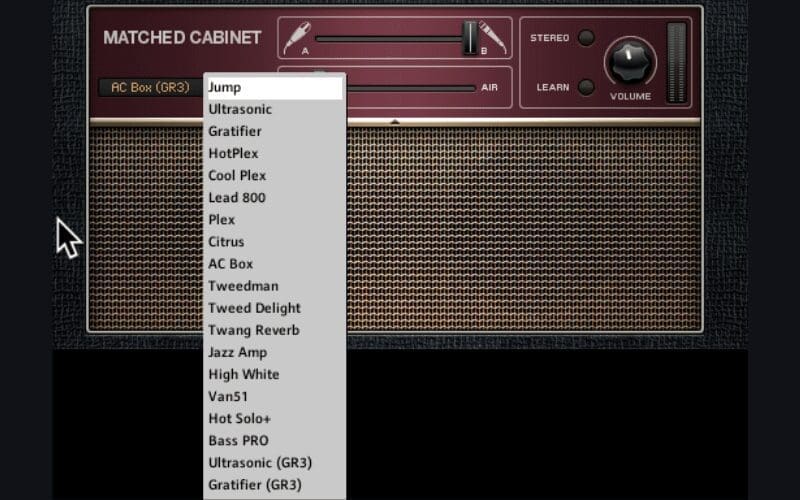
We can change to a different matched Cabinet by selecting the disclosure triangle and selecting a different cabinet or using the + or – to cycle through the matched cabinets:
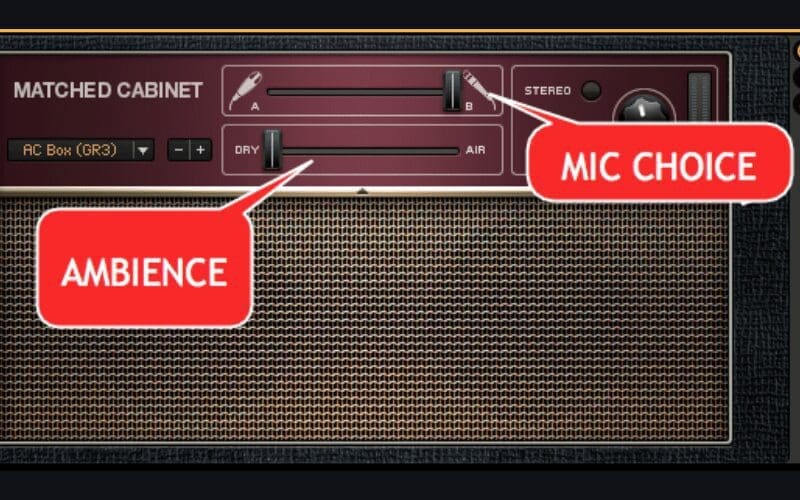
Each Cabinet was recorded using two different microphones. We can slide between the two to blend them to taste. Also, we can add ambiance by moving the “Air” slider:
Volume control is available on each Cabinet as well. The output volume can be automatically set by clicking the learn button and playing the track until the learn button turns off. This can be useful for preventing clipping.
TIP
If you are working with a Stereo track turn on the Stereo button in the Cabinet as well.
Guitar Rig: Control Room
While each Cabinet has only two recorded microphones we can drag a Control Room over the existing Cabinet to give us eight different mics.
Activating Control Room on an existing cabinet is simple:
1. Open the Components and go to the Cabinets section.
2. Drag the Control Room over top of the existing Cabinet in your Rack. It will overlay the Cabinet.
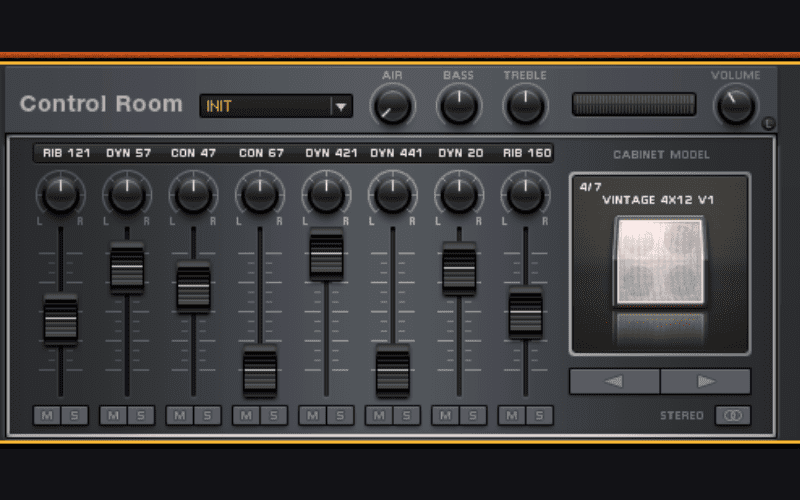
Each preset has a cabinet with eight microphones positioned for perfect phase alignment. Each mic has its fader. Also, there are Solo buttons and Panning knobs. We can cycle through the various Cabinet models using the right and left arrow buttons. There are advanced controls not found in other Cabinets:
1. Phase – adjusts for phasing issues that can occur when recording. Moving this slider can cancel out desired or undesired signals.
2. Room – This gives us some room tone picked up during recording.
The Pro version of Control Room provides eight custom setups at once with 16 microphones and three mic position settings. Control Room Pro uses high-quality impulse responses. With Control Room Pro we can:
1. Use eight different Cabinets on one Guitar
2. Change the Mic’s position on the Cabinet
3. Change the Mic used on the Cabinet
4. Change the speaker type on the Cabinet
5. Change the Mic used on the speaker
6. Blend, Solo, Mute, and Pan each of the eight Cabinets independently.
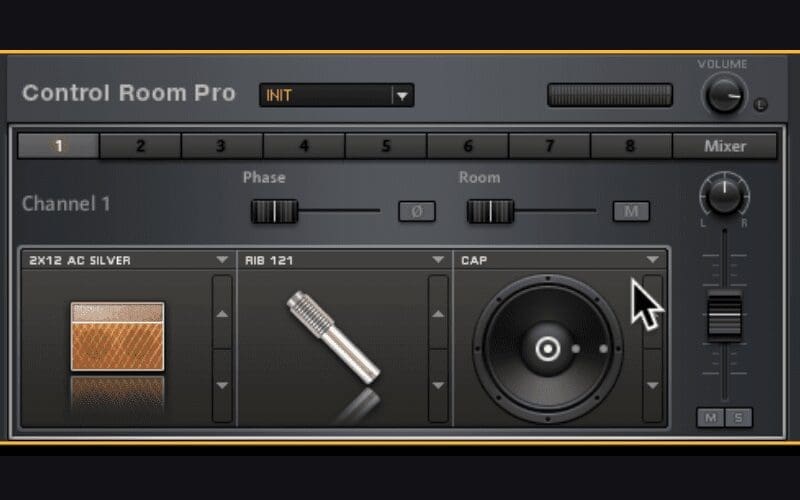
The Mixer Page (accessed by clicking the Mixer button) allows us to mix the level of each guitar cabinet. From this page, we can also: enable Stereo Mode, Adjust Bass, and Treble and add Air or ambiance.
Legacy Cabinets and Mics
Earlier I showed you how to enable the display of Legacy Applications. One of the “hidden gems” is found in the Legacy tab in the Components section, the Guitar Rig 4 Cabinet, and Mic.
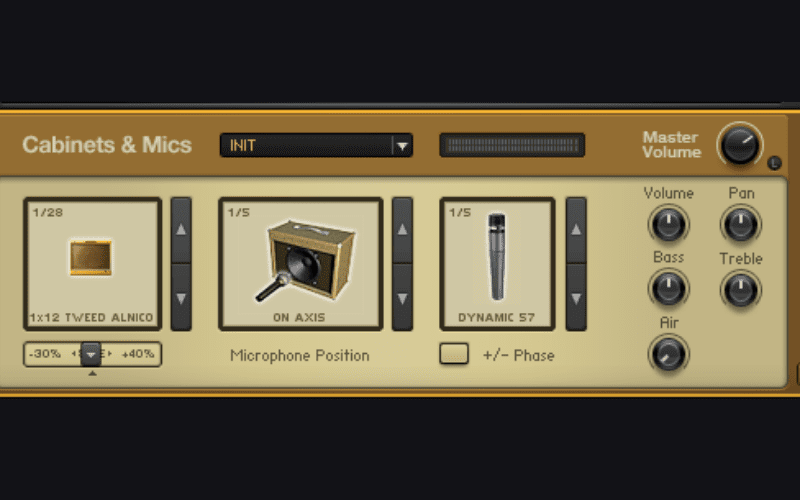
There are a few features found in the Guitar Rig 4 Cabinet not found in Guitar Rig 5:
1. We can increase the size of the Cabinet
2. We can move the mic position behind the Cabinet
Effects and Tools
While the Cabinets and Amps give us the power and initial sound shaping, the effects and tools give us the power to take our sound to a new level. With these tools, Guitar Rig Pro can be used on virtually anything from vocals, synths, drums, organs, pads, and FX. We can create soundscapes, drones, and ambiances as well. These can be used singly or in combination with other effects. Some effects sound better before an Amp while others sound better after.
Effects
There are 54 modeled stomp-boxes and effects from foot pedals and studio tools and are divided into the following groups:
1. Echo and Delay
2. Distortion and Overdrive – 11 fuzz, distortion and overdrive units reproduced from classic units.
3. Levels and Dynamics – includes compressors, limiters, noise gates, and volume pedals
4. EQ
5. Filters – Wah Wahs, and more
6. Modifiers – The modifiers include:
1. Adjustable 16 Step Analog Sequencer
2. Input Level – An envelope follower that scans the volume of the input signal and turns it into a control signal creating dynamic response effects.
3. Modern 16 Step On/Off Sequencer
4. Multi-Step Envelope with graphical editing
5. 5 waveform LFO with continuous or random modulation
7. Modulation – everything from vintage to modern
8. Pitch – Pitch and Transposition modules as well as Harmonizers
9. Reverbs
10. Special FX
Tools
The tools in this group allow us to take sounds even further and include:
1. Loop Machine – Create complex multi-part harmonies. Sync to host or export as a layered or merged loop.
2. Tape Decks – time-stretching to slow down a riff or transpose to another key. Record a loop in and play it back with FX.
3. Tuner
4. Metronome – Serves as the clock sync for all the rack modules as well as functions as a regular metronome.
5. Multi-effects – A container module that lets us create a custom channel strip. Master FX allows us to keep the Master FX set up while switching presets.
6.. Splitters – A module for creating a parallel effects chain that slips the signal, applies different effects chains, and combines them back together. The Crossover Mix device splits the signal between high and low frequencies. We can apply a chain to the high frequency only leaving the low untouched.
7. Crossover – Here we can load one Cabinet onto one side of the Crossover and a different Cabinet onto the other side. By setting the Crossover frequency we can assign one Cabinet to low frequencies and another to high frequencies!
8. Container – The Container control lets us control multiple Components at once. We can assign different controls to different Components.
TIP
Many of the Effects and Tools have Expert Menus so be sure to check them out for added features!
Using Guitar Rig 5 Creatively
A guitar Rig can be used in so many ways other than just a traditional amp and cabinet. I use it more creatively than traditionally. Here are a few of the ways that Guitar Rig can be used creatively:
1. Double a vocal track and add Guitar Rig to the second track. Add compression and other effects to create a distorted darker sounding vocal. Blend this back into the original vocal to add more weight and texture.
2. Add a Guitar Rig to a Snare Drum. Add a Compressor, EQ to bring out the best of the snare, and some Reverb or Delay.
3. Add a Guitar Rig to a synth pad and add some saturation or distortion to add body to the track.
4. Use a Guitar Rig on a synth lead and add a variety of effects to distort or change the sound to something new and different.
Guitar Rig Pro 5 can be used in every genre and style of music. I use it in my Techno tracks quite often. This program is a hidden gem and one that can be used to expand creativity in sound design, music production, and mixing. I’d love to hear about the creative ways you use Guitar Rig in your music!
Final Thoughts On Guitar Rig
Hopefully, after reading this article you feel much more confident in using Guitar Rig 5! There are a lot of features to get your head around but once you get used to them, you realize how great Guitar Rig is! There’s a range of simpler features as well as advanced ones for the pros out there! The best thing to do is to play around, try different features, and see what you find! You might stumble across a whole new sound! Good luck!
For musicians and producers an online metronome tool is essential when recording, try Music Gateway’s online metronome tool here.


